FIX Ruleset
Configuring FIX Rules
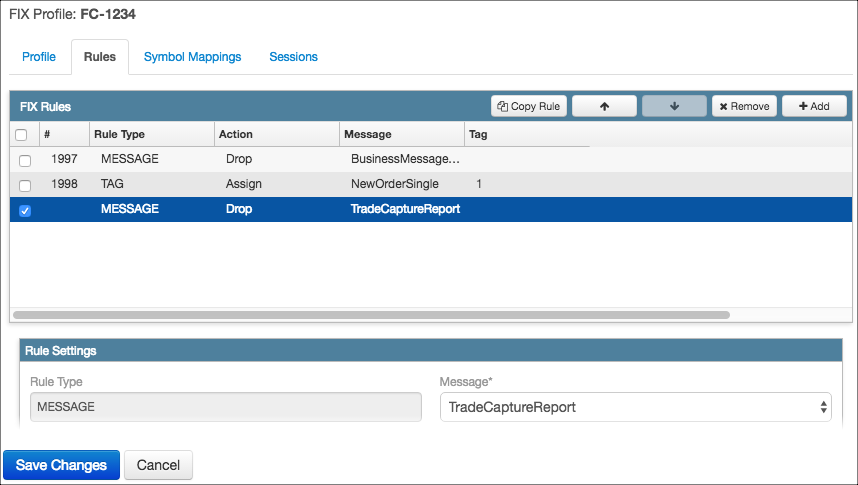
When adding a rule on the Rules tab, you can select one of the following rules for a FIX Ruleset:
- Message — Defines which messages to pass through conditionally or drop.
- Tag — Defines routing actions to take based on FIX tags.

Defining message rules
A message rule will either pass or drop a FIX message sent to and from a FIX client. You can define the following types of message rules:
- Drop to stop the message from being forwarded to its destination.
- Conditional to specify an action to take based on a message type and the value of tags in the message.
-
Custom to take an action defined by a user-defined script.
Note: Custom actions are available for advanced users only. Please contact TT support before assigning custom actions.
Configuring a drop action
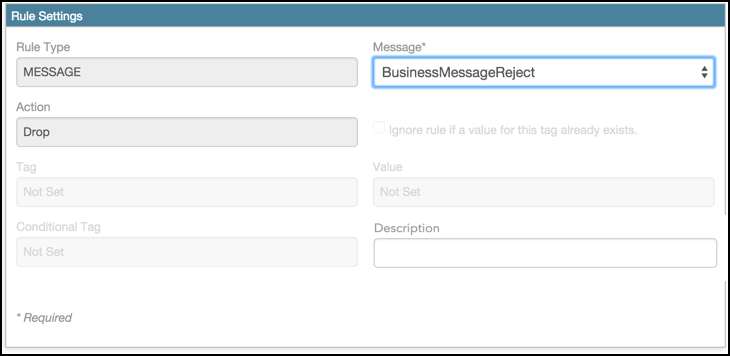
If either a FIX client or an exchange does not support a particular FIX message, you can use the drop action to prevent the message from being sent.
To configure a drop action, click Message in the Rules Settings section to select which FIX message to drop. Optionally, add more information about the action in the Description field. Then click Save Changes.
Configuring a conditional action
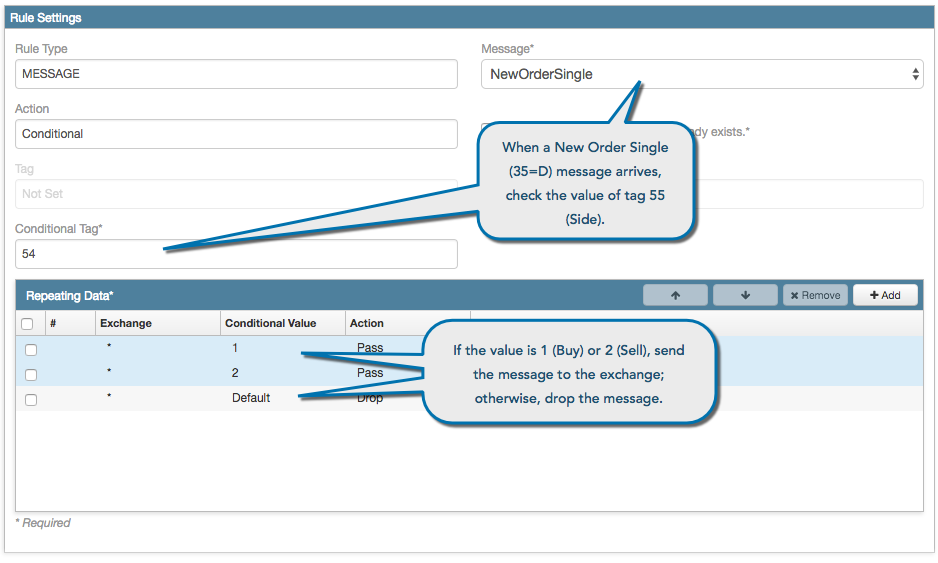
A conditional action instructs TT FIX to pass or drop a message based on the value of a specific tag in the message. The following example uses a conditional action to allow a FIX client to prevent FIX clients from submitting any new order whose side is neither Buy nor Sell.
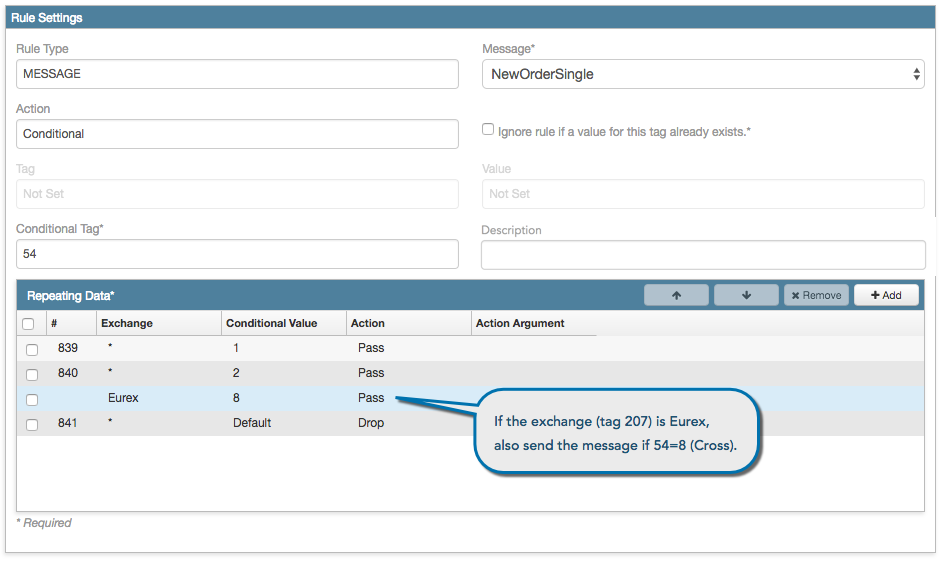
You can also use the select an Exchange to provide an extra condition to support exchange-specific tag values. This example expands the NewOrderSingle message rule to add a repeating data item that also sends the message when tag 54=8 (Cross) if tag 207=Eurex.
Defining tag rule actions
Tag rule actions allow you to manipulate tags and tag values in the messages sent between FIX clients and TT FIX. For example, you can drop tags sent from TT FIX in an Execution Report (8) message that your FIX client does not support. You can define the following types of tag rules:
- Add — Adds a tag and value to a message
- Assign — Assigns the value to tag
- Conditional — Specifies an action to take based on a message type and the value of tags in the message
- CreatePartyEntry — Allows a FIX client to send a flat tag in a FIX message and maps it to an exchange-specific party role and party ID on the message.
- Custom — Takes an action defined by a user-defined script
- Drop — Stops the tag from being forwarded to its destination
- ModifyPartyEntry — Allows a FIX client to send a specific party role and party id in a FIX message and remap that to an exchange-specific party role and/or party ID on the message. User may also use ModifyPartyEntry to remove an entire member of a repeating group.
- Multiply — Multiplies a numeric tag value by a number
- Prepend — Adds text to the beginning of an existing tag value
- Postpend — Adds text to the end of an existing tag value
- Remap — Assigns the value of one tag to that of another tag
- RemapGroup — Remaps the values for a group of tags
- RemapPartyEntry — This option has been deprecated and replaced by the ModifyPartyEntry.
- TrimTimestamp — Converts microsecond-precision timestamps in tag 60 (TransactTime) to millisecond-precistion timestamps.
-
Custom — Takes an action defined by a user-defined script.
Note: Custom actions are available for advanced users only. Please contact TT support before assigning custom actions.
Add action
The Add action allows you to add a value to tag that contains a numeric value. The classic example of using an add action would be adding tag 1 (Account) on order messages sent by a FIX client, when the FIX client system doesn't send tag 1 on its orders, because TT FIX requires tag 1 on order messages.
To configure an add action for a tag:
-
In the Rules Settings section, click Message to select the FIX message whose tag you want to configure.
-
Choose whether to Ignore rule if a value for this tag already exists.
-
Enter the Tag number you want to modify.
-
Enter the Numeric amount to add to the value of the specified tag.
Optionally, add more information about the action in the Description field.
-
Click Save Changes.
Assign action
This tag rule allows you change the value of a tag before forwarding the message on to the receiving party or to add a tag isn't sent by one party before sending the message to the counter-party. If the tag specified in the action does not exist in the message, the Assign action will add the tag. You can use this action to add a tag whose value is non-numeric, as the Add action accepts only numeric values.

Conditional action
TT FIX allows you to take actions conditionally based on the value of an input tag. For example, suppose you wanted to assign a different tag 1 (Account) value on order routing messages based on the tag 100 (ExDestination) value sent by the FIX client. You could create a conditional tag rule in the FIX Ruleset to do that.
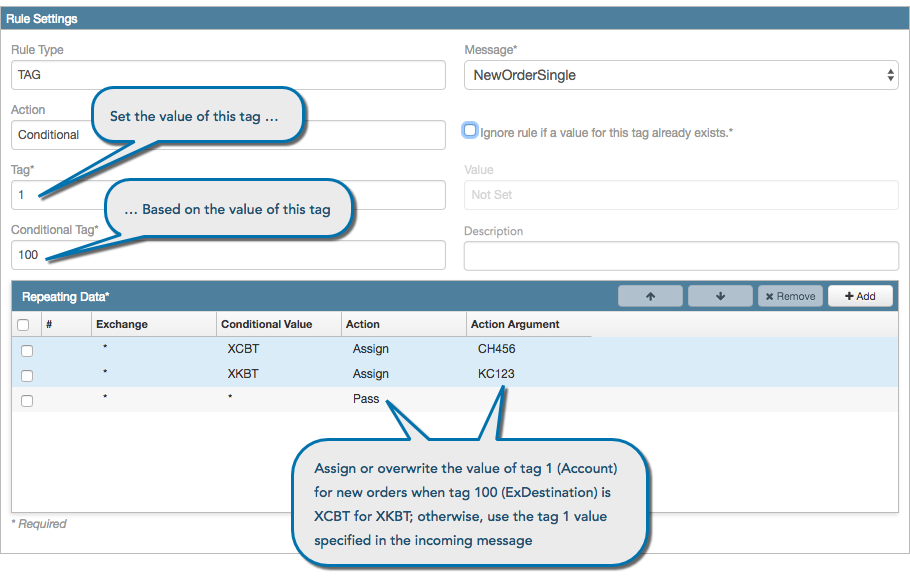
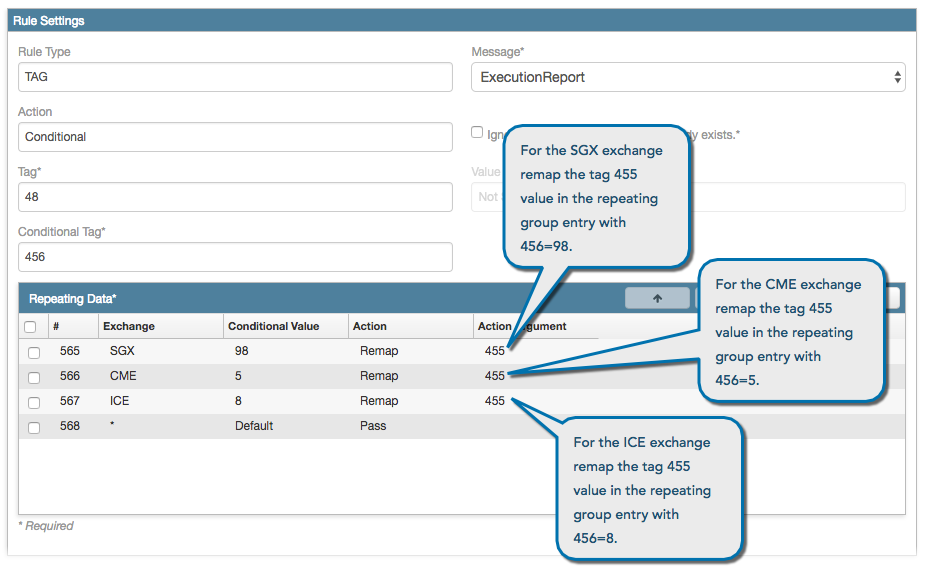
You can also use select an Exchange to provide an extra condition to support exchange-specific tag values. This example modifies the value of tag 48 (SecurityID) based on a combination of the value of tag 456 (SecurityAltIDSource) and the Exchange. These two conditions identify which tag 455 (SecurityAltID) value in the security alt ID repeating group to use when remapping the value to tag 48 based on the exchange specified tag 207 (SecurityExchange).
CreatePartyEntry action
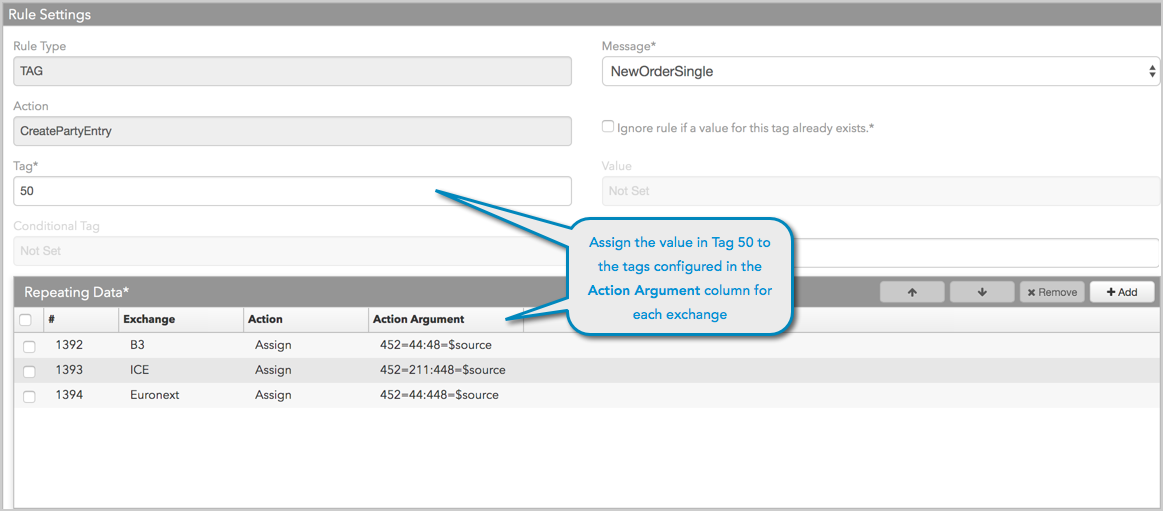
The CreatePartyEntry action allows a FIX client to send a flat tag in a FIX message and maps that to an exchange-specific party role and party ID on the message passed through TT FIX Order Routing. For example, if the client sends you Tag 50, you can add a rule that maps Tag 50 to Tag 452 and Tag 448 values required for routing to other exchanges.
To configure a CreatePartyEntry action:
- Click the Rules tab and click Add.
- In the New FIX Rule dialog box, select TAG as the rule type and CreatePartyEntry as the action and click OK.
-
In the Rules Settings section, click Message to select the FIX message whose tag you want to configure, and enter the Tag number. These are required fields.
Note: Ensure that the Ignore rule if a value for this tag already exists setting is not checked.
-
In the Repeating Data section, click +Add.
-
Click a cell in each column to configure the following:
- Select an Exchange or use the default value "*".
- Set the Action to "Assign".
- Set the Action Argument to the party role and ID values.
The Action Argument field must be configured in order for Tags 452, 448, and 2376. The tag and its value are assigned with "=", and each tag/value pair must be separated by a colon (:). For example: 452=211:448=$source
Note: Tag 2376 is optional and is only valid when Tag 452 is set to 3, 12, or 122.
A "Default" row is not required. If added, it contains the following: Exchange=*, Conditional=Default, Action=Pass. No other "Default" row configuration is supported.
Optionally, add more information about the action in the Description field.
-
Click Save Changes.
Drop action
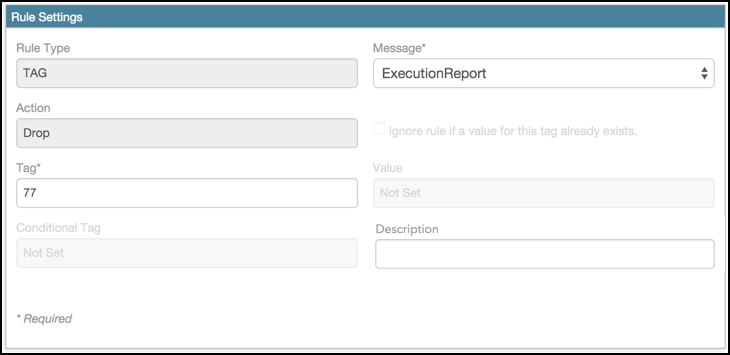
When a FIX client and TT FIX use different FIX specifications, the same message could support different sets of tags. In this situation, you might need to remove tags so the messages conform to the corresponding counter-party's requirements.
ModifyPartyEntry action
The ModifyPartyEntry action allows a FIX client to send a specific party role and party id in a FIX message and remaps that to an exchange-specific party role and/or party ID on the message passed through TT FIX Order Routing. For example, you can create a FIX Ruleset that remaps 452:200 to 452:205 values required for two different exchanges (e.g., ASX and CME).
The ModifyPartyEntry action also allows a FIX client to removal an entire member of a repeating group of FIX tags. For example, you can create a FIX Ruleset that removed tag 452 and automatically remove all associated tags in the repeating group (i.e., Tags 447 and 448).
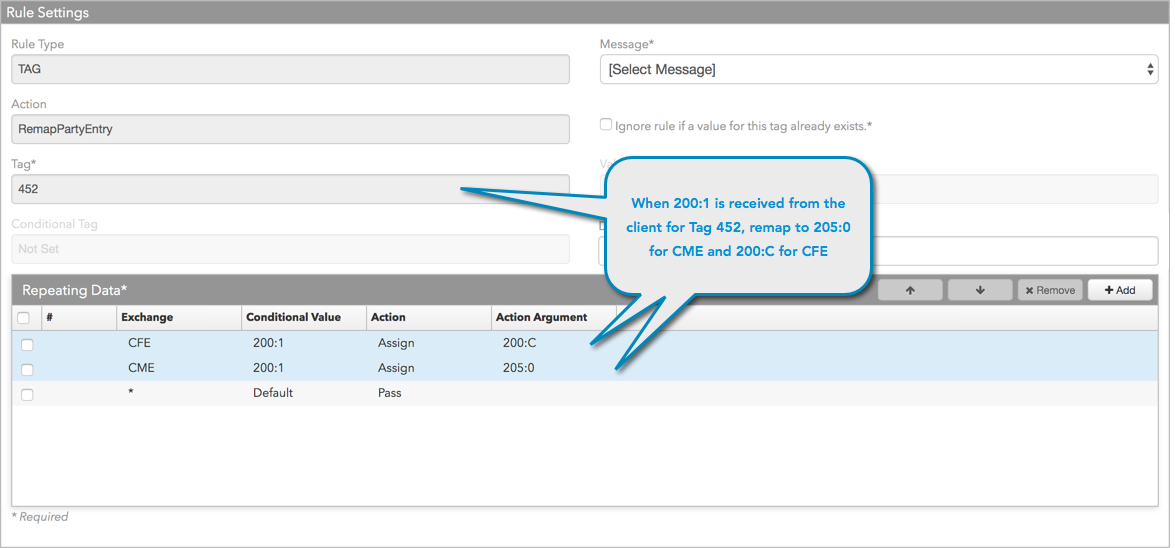
The Tag field for this action defaults to Tag 452 and cannot be changed. The Conditional Value field accepts values for Tags 452 (required), 448 (optional), and 2376 (optional). The values that you enter must appear in order using a colon ":" as a delimiter (i.e., 122:1:24). Also, the number of fields in the Conditional Value field must match the number and order of the fields in the Action Argument.
To configure a ModifyPartyEntry action:
- Click the Rules tab and click Add.
- In the New FIX Rule dialog box, select TAG as the rule type and ModifyPartyEntry as the action and click OK.
-
In the Rules Settings section, click Message to select the FIX message whose tag you want to configure.
The default value in the Tag field is "452" and cannot be changed. These are required fields.
Note: Ensure that the Ignore rule if a value for this tag already exists setting is not checked.
-
In the Repeating Data section, click +Add.
-
Click a cell in each column to configure the following:
- Select an Exchange or use the default value "*".
- Set the Conditional Value received from the client. Values must be in order (122:1:24) and be separated by a ":" delimiter.
- Set the Action to "Assign".
- Set the Action Argument to the remapped party role and ID values based on the conditional values.
The tag values in Conditional Value and Action Argument fields must be separated by a colon and match the order in which FIX parses the string (i.e, 452:448:2376).
A "Default" row is not required. If added, it contains the following: Exchange=*, Conditional=Default, Action=Pass. No other "Default" row configuration is supported.
-
Click Save Changes.
Multiply action
To configure an multiply action for a tag:
-
In the Rules Settings section, click Message to select the FIX message whose tag you want to configure.
-
Enter the Tag number you want to modify.
-
Enter the Multiplier to the tag value multiplier.
Optionally, add more information about the action in the Description field.
-
Click Save Changes.
Note: When you set a price multiplier on an inbound order message (New Order Single (D) or Order Cancel Replace (G)), TT FIX automatically divides the value for the corresponding outbound messages:
- Order acknowledgments and fills in Execution Report (8) messages
- Compliance drop copy New Order Single (D) or Order Cancel Replace (G) messages
Prepend action
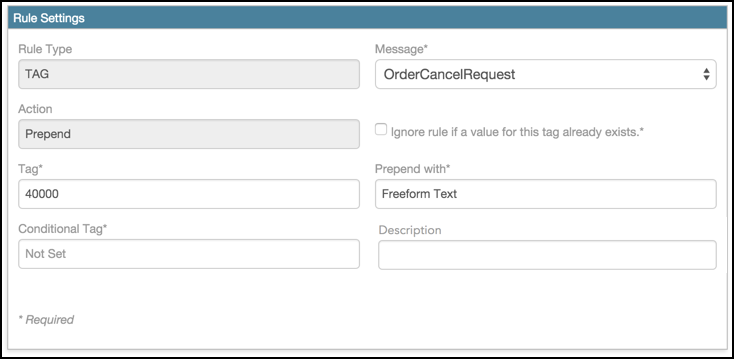
The prepend action allows you to add a text string to the beginning of a tag value.
Postpend action
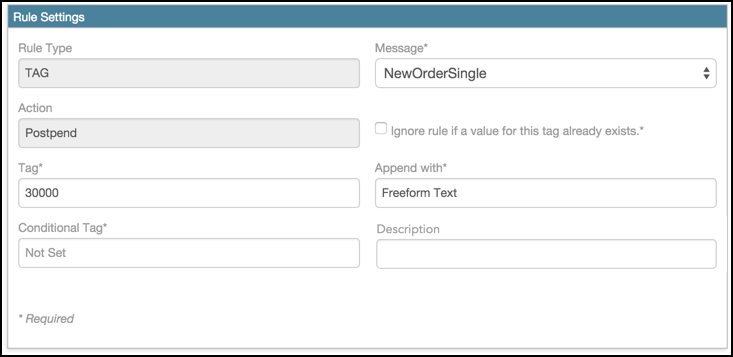
The postpend action allows you to add a text string to the end of a tag value.
Remap action
Suppose a FIX client uses a custom tag, 2000 (IsEnergy), to identify an energy contract that trades in flow instead of the contract quantity. TT FIX, however, uses tag 16464 (TradesInFlow) to indicate that information. To avoid having to rewrite the FIX client, you could use the remap action for a Security Definition (d) message to put the value from TT FIX into the tag used by the FIX client, as shown in the following example.

RemapGroup action
To configure a remap action for a tag:
-
In the Rules Settings section, click Message to select the FIX message whose tag you want to configure.
-
Choose whether to Ignore rule if a value for this tag already exists.
-
Enter the Tag number whose value you want to set.
-
Enter the Input source tag number containing the value you want put in the specified tag.
-
In the Repeating Data section, click +Add.
-
For each of the tags you want to remap:
- Enter the Tag number whose value you want to set.
- Set the Action to Remap.
- Enter the Input source tag number containing the value to want to put in the specified tag.
Optionally, add more information about the action in the Description field.
-
Click Save Changes.
RemapPartyEntry action (now ModifyPartyEntry)
Note:: This parameter has been deprecated and replaced by ModifyPartyEntry.
TrimTimestamp action
To change tag 60 (TransactTime) microsecond-precision timestamps to millisecond-precision timestamps:
-
In the Rules Settings section, click Message to select the FIX message whose tag you want to configure.
-
Make sure the Ignore rule if a value for this tag already exists setting is not checked.
-
In the Tag field, enter 60. Note that this rule only supports tag 60.
Optionally, add more information about the action in the Description field.
Click Save Changes.
Copying rules
To copy a message or tag rule:
-
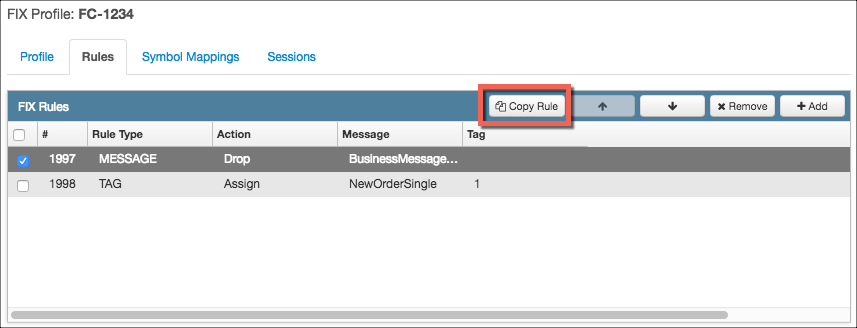
Select the FIX rule you want to copy, and click Copy Rule.
-
Select the message you want to associate with the copied rule, and click Copy.

-
Edit the new rule, if desired, and click Save Changes.
