


Introduction
Users may allocate selected filled orders to multiple trading accounts using the Allocation pane in the Orders and Fills widget.
For example, users can allocate fills in the following scenarios:
- Allocate Fills to One or More Accounts: Allows users to select a filled order and transfer fills to either a new account or to multiple accounts.
- Combine Multiple Orders Into a Single ‘Parent’ Order: Select multiple fills to combine into a single parent filled order.
- Carry Out a Client’s Specific Allocation Instructions: Allows users to copy and paste allocation instructions from an external csv or xml file.
Note See also: FIX Drop Copy Support
Accessing the Allocation Pane
To access the allocation pane, right-click the Order Book pane in the Order and Fills widget and select the Show Allocation Pane option in the context menu. Select the desired filled orders in the Order Book pane using the “eyeball” button ( ) in the “Watch” column.
Note: The eyeball button is used for viewing filled and partially filled orders in the bottom panes. In the Order Book pane, the checkbox is used for “selecting” an order to modify or cancel.
Allocating Fills to One or More Accounts
To allocate fills:
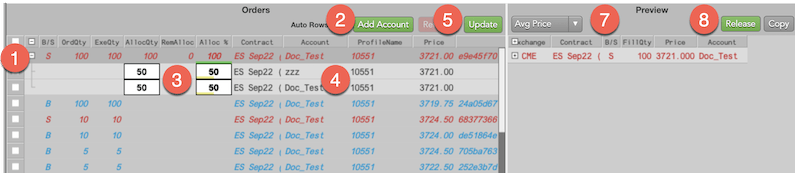
- In the Allocation pane, select the checkbox for the row you want to allocate.
Press the Add Account button
Note: You can set a specific number of rows to automatically open by adding a value in the Auto Rows field. Once set, pressing the Add Account button will automatically add the same number of rows as set in the Auto Row field
The description text appears in the Account dropdown for all accounts, if configured in Setup. This helps to quickly narrow a long list of accounts with just a few search keystrokes.
Note: Setting a new account in the allocation pane updates the account across your workspace unless you select the ‘Ignore Account list broadcast’ in the context menu.

- Update either the AllocQty or the Alloc % field to equal the quantity or percentage of the fill quantity that you want to allocate to a different account.
Select the new account in the Account field or select the profile in the ProfileName field.
Note: Selecting a profile will filter the Account list to just those accounts assigned to that profile in Setup.
Note: Existing Routing Rules can be selected as pre-defined templates to populate the Allocation/Orders pane with the account and quantity criteria needed to allocate filled orders.
- Once configured, select the original order and/or press the Update button to populate the Preview pane.
- In the Preview pane, use the drop-down to allocate the fills by either the Average Price or by using the actual Fill Prices.
Press the Release button to complete the allocation process and generate the fill records for the selected account(s). This pushes the updated fills to the TT system.
Warning: You cannot alter/delete the newly created fills from the TT system once they are released. Changes must be made outside of the TT system.
You can verify the allocation and view the status of the fills using the Allocated, the Release, the AllocQty, and the Alloc % columns in both the Order and Fills panes.

Combining Orders into a Single Parent Order
You may use the Allocation Pane to select multiple orders and roll them up into a single ‘parent’ order. For example, you may have multiple orders in the same contract that are filled at different prices throughout the day. With account allocation, you can combine those orders into a single record and report it with the average price.
To combine multiple orders:
In the Orders Pane, click the watch button next to the orders you would like to combine.
The selected orders appear in both the Fills Pane and the Allocation Pane.
- In the Allocation Pane pane, select the order rows you want to combine by either click-dragging across them or pressing the checkboxes at the start of each row.
- When the orders are highlighted, press the Add Accounts button. This causes a new row to appear beneath the selected order rows.
In the Account column, select the desired account in each order row.
Note: Even when combining orders, you may select a different account in each order row.
- To create a new fill report for the selected accounts, press the Update button. The new allocated record appears on the right in the Preview PaneYou can click the + button to expand the view if needed.
- Press the dropdown to select Avg price.
-
Press the Release button to send the updated records into the TT system.
Warning: You cannot alter/delete the newly created fills from the TT system once they are released.
You can verify the allocation and view the status of the fills using the Allocated, the Release, the AllocQty, and the Alloc % columns in both the Order and Fills panes.

Allocating Fills Using Customer Instructions From a File
You may use the Allocation Pane to import and execute allocation instructions from a .csv file, spreadsheet, or even a simple text file. However, you must ensure the following when setting up the allocation instructions file.
The format of the spreadsheet may contain as many columns as desired. However, it must include two columns, separated by commas, that map Quantity and the Account. TT supports up to 200 rows per file. The file does not need a header row.
- Columns: The file must contain two columns, separated by commas, that can map to Quantity and the Account. It may contain as many additional columns as desired.
- Rows: TT supports up to 200 rows per file.
- Header Columns and Rows: For the import, header columns and rows are not required.
- File Type: TT supports .csv, spreadsheets, and simple text files that match the Quantity and Account column requirement above.
To import allocation instructions from a file:
In the allocation instruction file, highlight just the quantity and account values. Do not include any header columns or rows.
Right-click on the highlighted cells and select Copy. You can now apply these instructions to the order.

- In the Order and Fills widget, click the Watch column next to the order you want to allocate. The fills display in the middle Fills Pane and that the order appears in the Allocation Pane at the bottom.
In the Allocation Pane, right-click on the desired order and select Paste Allocation Instructions.

New rows appear under the original order row with a single row for each row in the file. In addition, the quantity and accounts should match the file.
Note: You must ensure the accounts must be valid for this order and the order profile, if configured.
- Verify all order settings are correct and press the Update button to stage the order. The Preview Pane on the right populates with the two new records. Click the + button to expand the view if needed the view the original order and the new rows with the new accounts.
- In the Preview pane, use the drop-down to allocate the fills by either the Average Price or by using the actual Fill Prices.
Press the Release button to complete the allocation process and generate the fill records for the selected account(s). This pushes the updated fills to the TT system.
Warning: You cannot alter/delete the newly created fills from the TT system once they are released.
FIX Drop Copy Support
- Allocations done in TTW are sent as Execution Reports (ERs) to Drop Copy and routed based on the TT account in the allocated ER.
- A new order id is assigned for each account allocation ER. The unique_exec_id (tag 16112) will be the same on each allocated ER as on the original ER they were allocated from.
- There is currently no FIX tag on allocated ERs that contains the value of the order ID that the ER was allocated from.
- On allocated ERs, FIX LinkID (16113) + LinkType(16114)=8 represents an internal ID used by TT.
- Allocated ERs currently set 21=3, which normally identifies the ER as being part of a care order. This will be corrected in a future release.
- Customers who want to receive TTW allocations via TT FIX Drop Copy are encouraged to integration test this functionality in UAT before enabling it in Production.