Trade
Overview
TT Platform
Description
Task
Browser Access
Description
Task
Videos
TT Desktop
Description
Task
Videos
Reference
Workspace Windows
Description
Task
Videos
Widgets
Description
Task
Preferences
Description
Viewing Market Data
Time and Sales
Task
Reference
Description
Depth
Description
Task
Reference
Market Grid
Description
Task
Videos
Reference
Product Grid
Description
Task
Reference
Spread Matrix
Description
Task
Videos
Reference
Basic Order Entry
TT Order Types
Description
Task
Videos
Reference
Case Studies
TT Premium Order Types
Description
Task
Reference
Order Ticket
Description
Task
Use Cases
Reference
MD Trader®
Description
Task
Videos
Reference
Order Profiles
Description
Task
Reference
Routing Rules
Description
Task
Blocktrader
Description
Task
Videos
Reference
Trading Crypto on TT
Description
Task
Videos
Reference
Trading on B3
Order Management
Order Book
Description
Task
Reference
Floating Order Book
Description
Task
Reference
Fills
Description
Task
Reference
Positions
Description
Task
Reference
Orders and Fills
Description
Task
Reference
Audit Trail
Description
Task
Reference
Audit Query
Description
Task
Reference
Account List
Description
Task
Videos
Reference
Position Manager
Description
Task
Reference
Alert Manager and Alert Viewer
Description
Task
Videos
Reference
Account & User Restrictions
Description
Task
Reference
Balances
Description
Task
Reference
TT® OMS
Care Orders
Description
Task
Videos
Reference
Lock and Release
Description
Task
Bulking
Description
Task
Videos
Stitching and Splitting
Description
Task
Combining
Description
Task
Order Passing
Description
Task
Use Cases
Order Exceptions
Description
Task
Options
Options on TT
Description
Videos
Options Chain
Description
Task
Use Cases
Videos
Reference
Options Trade Monitor
Description
Task
Videos
Reference
Vol Curve Manager
Description
Task
Use Cases
Videos
Reference
Electronic Eye
Description
Task
Videos
Reference
RFQ Viewer
Description
Task
Videos
Reference
RFQ with Counterparties
Description
Task
Counterparty Manager
Description
Task
Strategy Creation
Description
Task
Use Cases
Reference
Options Risk
Description
Task
Videos
Reference
Options Risk Matrix
Description
Task
Videos
Reference
Watchlist
Description
Task
Videos
Reference
Expiration Manager
Description
Task
Volatility Calculator
Description
Task
TT Uncovered 2.0
Description
Task
TT Uncovered 3.0
Description
Task
QuikStrike
Description
Task
Spread Trading
Autospreader
Description
Task
Use Cases
Videos
Reference
Autospreader Rules
Description
Task
Videos
Reference
Hedge Manager
Description
Task
Videos
Reference
Trading in Yield
Description
Task
Use Cases
Reference
Aggregator
Description
Task
Videos
Reference
Algo Trading
Algo Dashboard
Description
Task
Videos
Reference
Template Manager
Description
Task
Order Management Algos (OMAs)
Autotrader
Description
Task
Reference
Videos
Excel integration with TT
Description
Task
Videos
Reference
Market-Making Algos
Analytics
Charts
Description
Technical Indicators
Task
Videos
Reference
Trader Analytics
Description
Task
Reference
ADL
ADL Overview
Introduction to ADL
Description
Task
Videos
Reference
ADL Basic Concepts
Description
Task
Reference
Building your first algo
Lessons
Advanced concepts
Description
Task
Case Studies
Jump blocks
Group blocks
Virtualized blocks
Library blocks
Trading Blocks
Discrete blocks
Arithmetic blocks
Basic blocks
Logic blocks
Miscellaneous blocks
Setup
Setup Overview
Getting Started
Description
Task
Videos
Reference
Supported Order Types and TIFs
Company Administration
Connections
Description
Task
Videos
Reference
Accounts
Description
Task
Videos
Use Cases
Reference
Users
Description
Task
Videos
Reference
Company
Description
Task
Reference
Order Tag Defaults
Description
Task
Account Administrators
Description
Task
TT Premium Services
Description
Task
TT Access
Description
Task
Advanced Features
Description
Risk Management
Risk Administration
Description
Task
Risk Limits
Description
Task
Videos
Reference
Pre-Trade Portfolio Risk
Description
Task
Reference
Order Cross Prevention
Description
Task
Videos
KRM Limits
Description
Task
TT® OMS
TT OMS Administration
Description
Task
Use Cases
Reference
Exchanges: Americas
B3
Description
Task
CBOE
Description
Task
Cboe FX
Description
Task
Reference
CFE
Description
Task
CME
Description
Task
Dealerweb
Description
Task
EBS Direct
Description
Task
EBS Market
Description
Task
Fenics
Description
Task
FMX
Description
Task
FMX_USTF
Description
Task
Goldman Sachs Commodity Blocks (GSCB)
Description
Task
Referece
ICE
Description
Task
MexDer
Description
Task
MIAX_FUT_CH
Description
Task
MIAX_FUT_NY
Description
Task
MX
Description
Task
Nodal
Description
Task
NFI
Task
Exchanges: EMEA
ATHEX
Description
Task
BIST
Description
Task
DGCX
Description
Task
EEX
Description
Task
EPEX SPOT
Description
Task
Reference
Eris
Description
Task
Eurex
Description
Task
Videos
Euronext
Description
Task
GFO-X
Description
Task
ICE_L
Description
Task
JSE
Description
Task
LME
Description
Task
LME NTP
Description
Task
LSE
Description
Task
MEFF
Description
Task
NDAQ_EU
Description
Task
NASDAQ_NED
Description
Task
Nord Pool
Description
Task
Reference
WSE
Description
Task
Exchanges: Asia/Pacific
ABX
Description
Task
ASX
Description
Task
FEX
Description
Task
HKEx
Description
Task
JPX
Description
Task
NSE
Description
Task
NZX
Description
Task
SGX
Description
Task
SGX GIFT
Description
Task
TAIFEX
Description
Task
TFEX
Description
Task
TFX
Description
Task
CoinFLEX
Task
Exchanges: Crypto
Coinbase
Description
Task
Kraken
Description
Task
FIX Support
FIX Ruleset
Description
Task
FIX Sessions
Description
Task
Secondary Accounts
Description
Task
Monitor
TT Mobile
TT Backtesting
APIs
TT REST API 2.0
Getting Started
API Reference
TT REST API 2.0 (UAT)
Getting Started
API Reference
TT .NET SDK
Getting started with TT .NET SDK
Creating the application framework
Working with instruments
Subscribing for market data
More about prices
An in-depth look at the Price class
Working with orders and fills
Handling trade subscriptions
Working with trade subscriptions
Working with Algos
Algo Server
TT Order Types
TT Premium Order Types
Advanced Concepts and Options
Appendix
TT CORE SDK
Getting Started with TT Core SDK
Creating Application Framework
Working With Instruments
Subscribing for Market Data
Working with Orders and Fills
Creating a TT Application Server
Appendix
TT Trade Surveillance
Overview
Using TT Trade Surveillance
Cluster View
Core Models
Market Abuse Models
Cross Product Models
Spoofing Models
Improperly Matched Trade Models
Market Rate Models
Trading Behaviors Models
Miscellaneous Models
Configurable Models
Reports
Reference
TT FIX Services
TT FIX General
Getting Started
FIX Message Structure
Session messages
TT FIX Order Routing
Overview
TT FIX message conversations
Supported application messages
TT FIX Market Data
Overview
TT FIX message conversations
Supported application messages
TT FIX Drop Copy Out
Overview
TT FIX Message Conversations
Supported application messages
Compliance Feed messages
TT FIX Drop Copy In
Overview
Supported application messages
TT FIX Gateway
Getting Started
FIX Message Structure
Components
Session messages
Price Gateway Messages
Order Gateway Messages
TT FIX Recovery
Overview
FIX Recovery Methods
Supported application messages
Compliance Feed Messages
MiFID II Support

Importing data using TT Data File Upload

On this page

Overview

TT Trade Surveillance offers the ability to upload data via a .csv file. This allows users to easily add and process data into TT Trade Surveillance. The TT Trade Surveillance File upload uses the same file upload method that TT uses for uploading credit, start of day, and product margin files.

Prerequisites

Prior to uploading files:

  • You must configure connection access for file uploads. Refer to the Configuring Access for File Uploads section in the Setup help for more details.
  • Each company must have at least 1 account with Type set to Audit Trail Only. Refer to Creating a New Account in the Setup help for more details.

Supported Formats

To support this functionality, you must ensure the columns and rows in your .csv file matches one of the following formats:

  • Generic Audit Trail File: TT’s custom format. When importing data from any external source, you must ensure the file contents match the correctly mapped Generic Audit Trail File. For your convenience, you can download a sample mapping file here.

  • Trayport Format: TT Trade Surveillance supports .csv files exported directly from the Trayport application. For more information on Trayport, refer to the Trayport’s Daily Market Activity File Guide available on their website.

    Note If all of the trader fields (Trader, InitiatorTraderName, AggressorTraderName) are set to empty, those records will be treated as non-customer data and filtered out of Trade Surveillance processing. Also, if one of the trader fields is set to System Anonymous Trader, it will be filtered out of Trade Surveillance processing.

Uploading a File

TT offers two methods to upload data files into the platform: Data File Upload and Auto Upload. Both methods are available in the Company Settings section of the Setup application.

  • Data File Upload: This method allows direct upload of a single data file.

    Note The Data File Upload method has a 10mb file size limit. If uploading larger amounts of data, TT recommends using the Auto Upload feature.

  • Auto Upload: This method allows scheduled, automatic daily file uploads and supports files larger than 10mb.

Directly uploading a single data file

To upload a direct data file:

  1. Ensure that you are logged into the TT platform with an administrator account and open the Setup application.

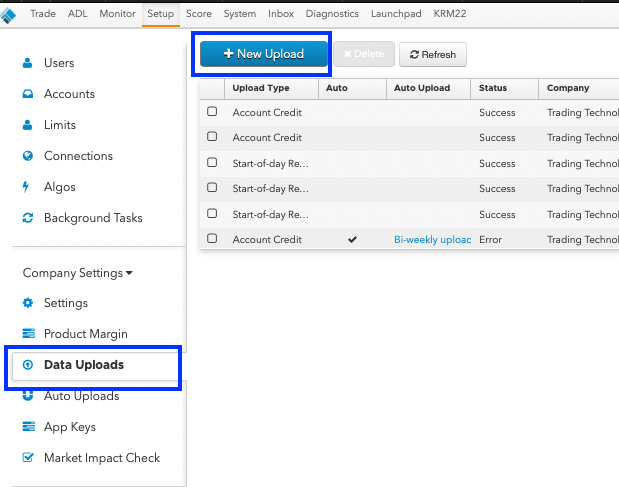
  2. In the Setup application, select Company Settings | Data Uploads in the left navigation pane.

  3. Press the New Upload button. The Upload File window displays.

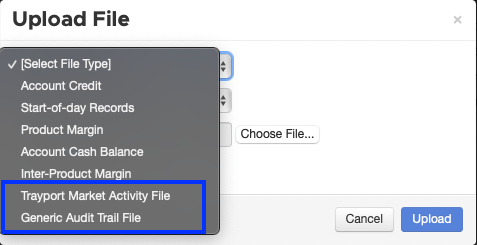
  4. In the Select File Type dropdown, select either Trayport Market Activity File or Generic Audit Trail File depending on the type of file you wish to upload.

  5. For Generic Audit Trail File, select CSV in the Select File Format dropdown menu. For Trayport Market Activity File, you can select either CSV or, if uploading a compressed csv file, select ZIP.

  6. Press the Choose File… button and navigate to the location of your file.

  7. Optionally, check Continue on Error. When this option is checked (enabled), Setup continues uploading data regardless of how many upload errors may be logged and shown in the Upload Errors section. By default, this option is unchecked (disabled) and the upload stops when the first error is detected.
  8. Press the Upload button to begin the file upload.

A record of the uploaded file and its status appears in the grid. Click the checkbox next to the record to review the Output section, which displays how many rows of the file are processed. Any errors that occur during the upload will appear in an Error section on this page.

Uploading via the Auto Upload

As a company administrator, you can use the Auto Uploads tab to schedule recurring, automated data file uploads. The uploads can be scheduled to occur at the days and times that best suit your company’s business needs.

When creating a schedule, you can set the time (UTC) and days of the week that the upload will run, as well as:

  • Select a file format
  • Schedule retry attempts
  • Select a secured FTP site as the source of the data upload
  • Modify existing upload schedules
  • Schedule multiple uploads
  • View results of the uploads

Setting the File Name for Automatic Uploads

When setting the File Name field, you should set this value equal to Companyname-%y%m%d(-N).csv.zip where:

  • Companyname equals the name of your firm.
  • -%y%m%d configures Setup to look for a file with the year, month, and the current date.
  • -N represents an optional flag to upload a file dated N days prior.

Setting File Name to Trading_Firm-%y%m%d.csv.zip causes the server to always upload a file with the current date.

While setting File Name to Trading_Firm-%y%m%d(-1).csv.zip causes the server to always upload the previous day’s file.

To schedule automatic uploads:

  1. Ensure that you are logged into the TT platform with an administrator account and open the Setup application.

  2. Click Company Settings | Auto Uploads in the left navigation pane.
  3. Click + New Auto Upload.
  4. In the Auto Upload Settings screen, configure the following (all settings are required unless noted):

    • Name — Enter a name for the scheduled upload. When adding multiple schedules, each name must be unique.

    • Protocol — Select a protocol to use for uploading the data (e.g., SFTP).

    • Server — Enter the server hostname that is the source of the data upload. The SFTP port is automatically set to “22.”

    • Path — Enter the path to the file being uploaded from the server. This field is optional.

    • Username — Sets the username for logging in to the server.

    • Password — Sets the password for logging in to the server.

    • File Name — Enter the name of the file being uploaded.

      Set the file name equal to the Companyname-%y%m%d(-N).csv.zip where Companyname equals the name of your firm and the optional -N flag equals the number of days prior to the current day. For guidance on setting this value, refer to the Setting the File Name for Automatic Uploads section above.

    • Start Time (UTC): — Sets time at which to upload the file to TT. Enter a time in UTC in the hh:mm format (e.g., 23:59).

    • Retry For (Minutes) — Sets how long to wait before retrying the upload. Enter a time in minutes.

    • Days to Run — Select which days to run the automated upload.

    • File Type — Select the file type (i.e., Trayport Market Activity File or Generic Audit Trail File).

    • File Format — Select the csv format for the selected file type.

    • Continue on error — When this option is checked (enabled), Setup stops logging after 20 errors, but continues to upload the file. When it is unchecked, Setup stops uploading data once it logs 20 errors. This option is unchecked (disabled) by default.

  5. Click Create.

    The schedule appears in the Auto Uploads grid at the top of the screen.

    Results of the upload are stored in Data Uploads.

Refer to the Scheduling Automated Data Uploads section in the Setup help for more information on creating, modifying, and viewing the results for your automated uploads.

Viewing Automated Upload Results

After the scheduled upload runs, the Setup application displays the results and stores a record of the file upload on the Data Uploads page. Click Data Uploads in the left-navigation pane to view a log of the results.

Additional Considerations

Trade Surveillance processing time depends on the size of the data.

At this time, TT does not validate the data. If the data does not appear correctly in TT Trade Surveillance, you should double-check that the file’s data correctly matches the Generic Audit Trail File.