







Score Admins in TT Trade Surveillance hold full access to the product. User Management lets you narrow that access You can build roles from a set of capabilities (the grantable units of access, one or more per page) and assign one role to each Score Admin. The role determines which pages appear for that user and which actions they can take on each one.
User Management is where a Company Admin builds those roles and assigns them. Open it from the User Management tab in the Trade Surveillance menu bar.
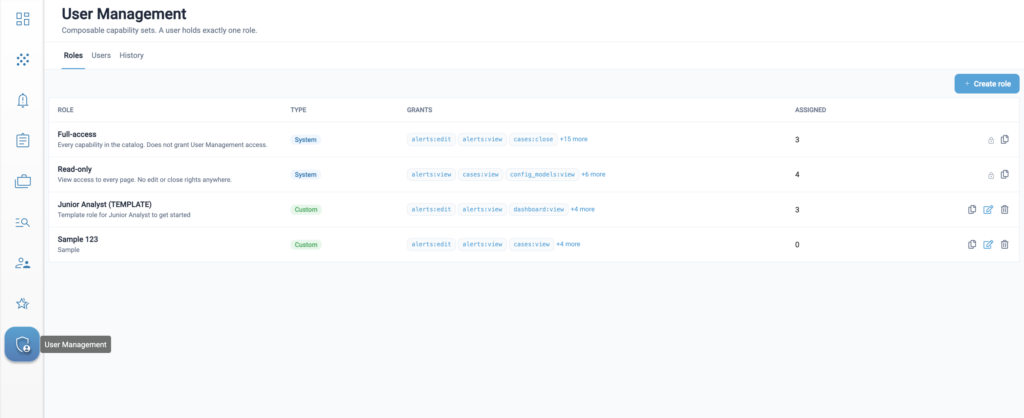
User Management has three tabs:
- Roles — Lists every role in your company, the capabilities each one grants, and how many users hold it. Create, edit, clone, and delete roles here.
- Users — Lists each user in your company with their assigned role, access level, and resolved capability count. Assign and reassign roles here.
- History — Displays a read-only record of every role change and every role assignment in your company.
Access to User Management
Access to User Management is granted by the Company Admin permission, which is set in TT User Setup. It is not a capability and cannot be granted by any role in Trade Surveillance — including Full-access, or a custom role built with every capability available. This is deliberate: no role you create can be used to give someone the ability to change permissions.
- Company Admins — Can access all three tabs and create, edit, delete, and assign roles within their own company.
- All other users — Cannot access User Management.
Note: The TT User Setup Company Admin permission is separate from the Score Admin access level. Being a Score Admin does not make you a Company Admin, and a Company Admin can hold any access level.
Access to pages by role
Pages not granted by your role do not appear in the navigation. If an expected page is missing, your role does not grant it. Contact your Company Admin to request access.
Roles and capabilities
The Roles tab lists every role available in your company.
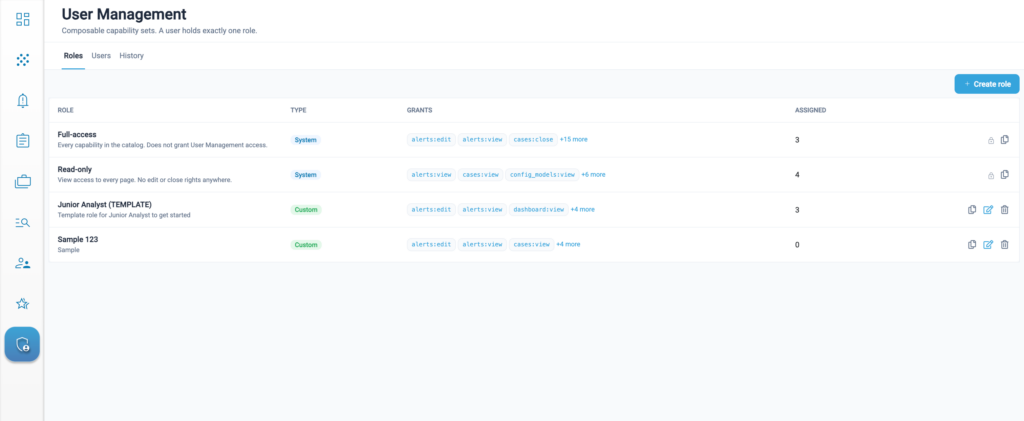
The table shows:
- Role — The role name, with its description underneath.
- Type — A badge: System for the two predefined roles, Custom for any role created in your company.
- Grants — The capability keys the role carries, with a +n more indicator where the list is truncated.
- Assigned — The number of users currently holding the role.
Row actions appear on the right:
| Icon | Action | Available on |
| Lock | Indicates the role cannot be modified | System roles |
| Copy | Clone the role into a new editable custom role | All roles |
| Pencil | Edit the role | Custom roles only |
| Bin | Delete the role | Custom roles only |
Use Search roles to filter the list by name.
Role Types
- Predefined (System) roles — Two roles are available by default with every company and cannot be edited or deleted by any user.
- Read-only — View access to every page. No edit or close rights anywhere.
- Full-access — Every capability available. Note that this does not include User Management, which is permission-gated rather than role-gated, so Full-access never means “can administer roles”.
Note: Both can be cloned, which is the quickest way to start a role that is close to either one.
- Custom roles — Roles created in your company. A custom role is visible and assignable only within your company, and its name must be unique there.
Capabilities
Each page has an access model:
- None / Visible: The page is either available or not. Dashboard and DataLens work this way.
- None / View / Edit:
- View grants read access;
- Edit grants the ability to change things. Alerts, Cases, Configurable Models, Company Preferences, Cross-Product Preferences, Reports, and Surveillance work this way.
Surveillance and Cases additionally carry a separate grant for closing, so you can give an analyst the ability to work clusters and cases without the ability to close them.
Two rules apply throughout, in the editor and on the server:
- Edit includes View. Selecting Edit for a page automatically grants View.
- Close requires Edit. The close grant is unavailable until Edit is selected, because you cannot close something you cannot act on.
Roles available to users
Roles apply to Score Admins. The table below lists which users can be assigned roles:
| Access level | Can be assigned a role? | Why |
| Score Admin | Yes | Holds full access by default. These are the users that roles exist to narrow. |
| Score Account Admin | No | Carries a reduced, predefined set of access. |
| Score User | No | Carries a reduced, predefined set of access. |
| Company Admin | No | No Company Admin can change another Company Admin’s permissions, including their own. |
On the Users tab, rows that you cannot assign show a lock icon in place of the pencil. The tab lists every user in your company, but only Score Admin rows are actionable.
To bring a user into the role model (e.g. an auditor) they must first be provisioned as a Score Admin in TT User Setup. Until then their row is locked.
Note: Reports access carries the reports built on cluster and case data (including the Cluster List Export and Unreviewed Cluster List Export) without a separate Surveillance or Cases capability. Take this into account when you shape a role around either close grant.
Creating a role
Cloning an existing role
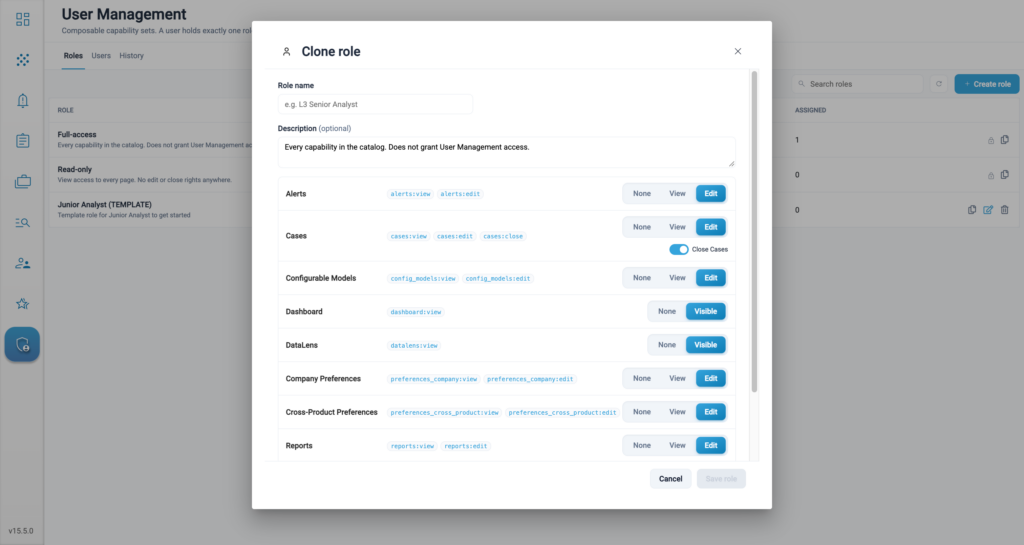
Cloning is usually faster than building a role from scratch and works on any role including the two System roles.
1. On the Roles tab, find the original role that you want to clone.
2. Click the clone icon on its row.
3. Enter a Role name for the new role.
4. Adjust the access levels as needed, then click Save role.
The clone is a custom role carrying the original’s capabilities. The original is unchanged.
Creating a new role
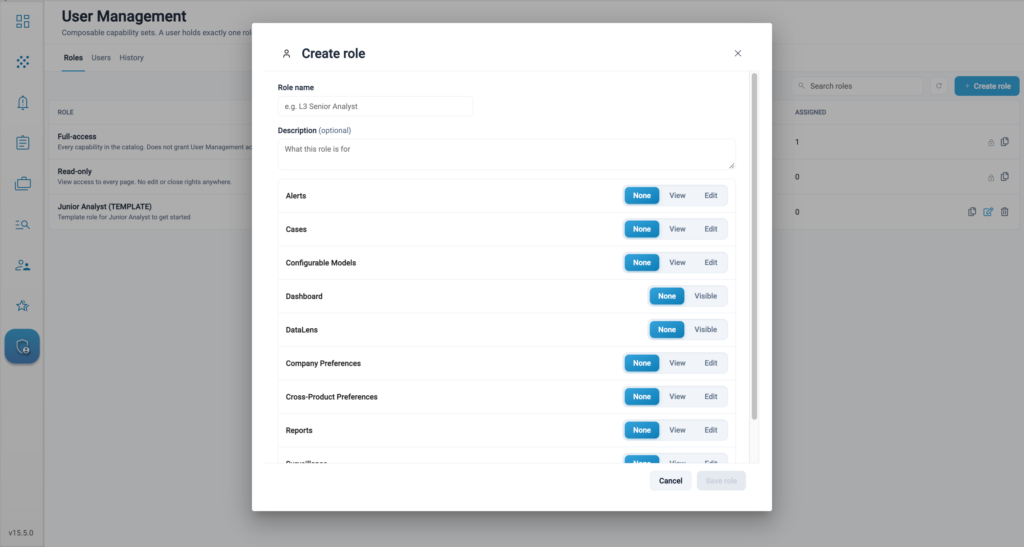
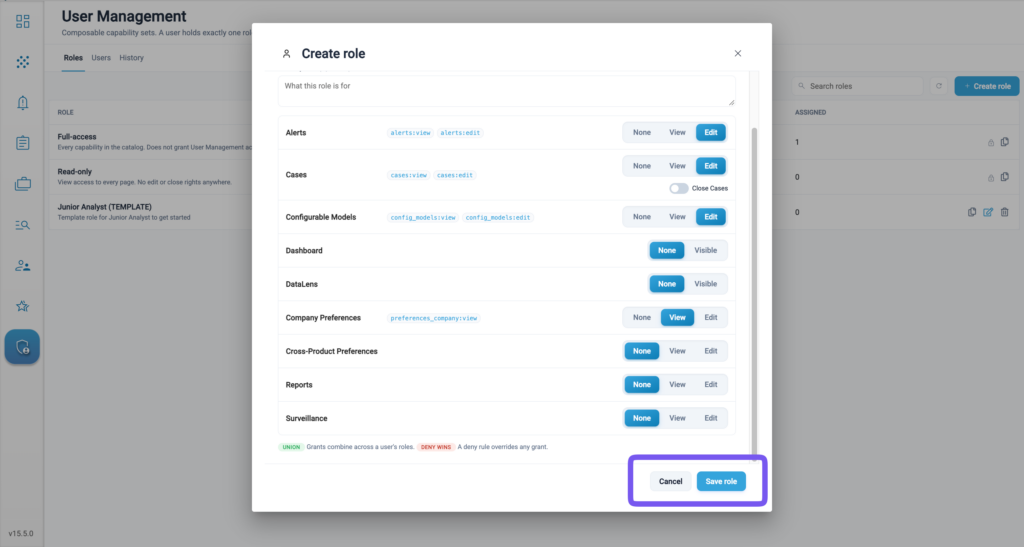
1. On the Roles tab, click + Create role.
2. Enter a Role name. This is required — Save role stays disabled until you provide one.
3. Optionally, enter a Description. This appears under the role name in the Roles list and can help administrators understand the role’s purpose.
4. Set an access level for each page.
5. Click Save role.
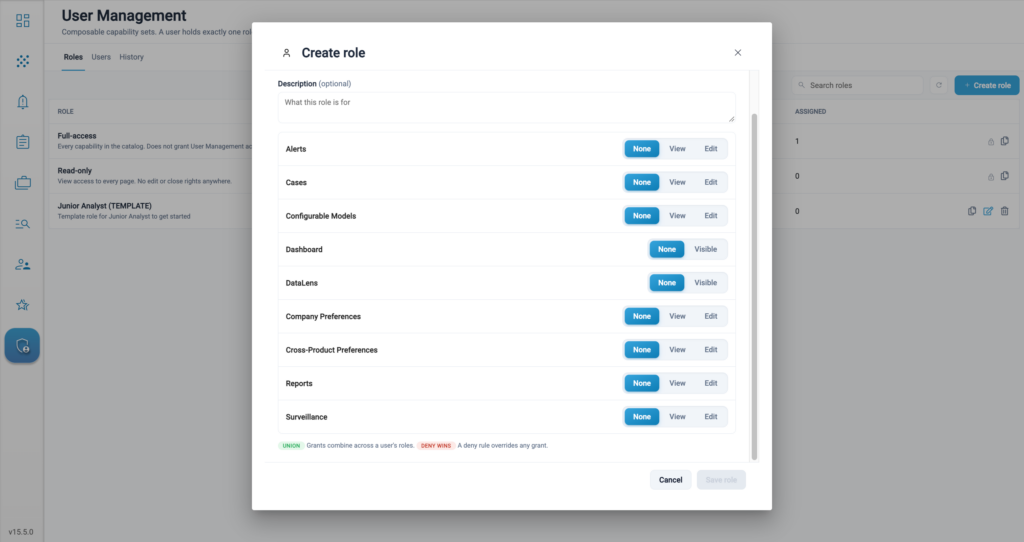
The dialog lists the pages:
| Page | Control |
| Alerts | None / View / Edit |
| Cases | None / View / Edit, plus the close grant |
| Configurable Models | None / View / Edit |
| Dashboard | None / Visible |
| DataLens | None / Visible |
| Company Preferences | None / View / Edit |
| Cross-Product Preferences | None / View / Edit |
| Reports | None / View / Edit |
| Surveillance | None / View / Edit, plus the close grant |
Every page defaults to None, so a new role starts with no access and you grant access to the role.
Note: User Management does not appear in the dialog. Access to it is provisioned in TT User Setup through the Company Admin permission and cannot be granted by a role.
Editing a role
Click the pencil icon on a custom role. The dialog opens with the role’s current access levels already set; modify the access levels and click Save role.
Note: System roles cannot be edited.
Deleting a role
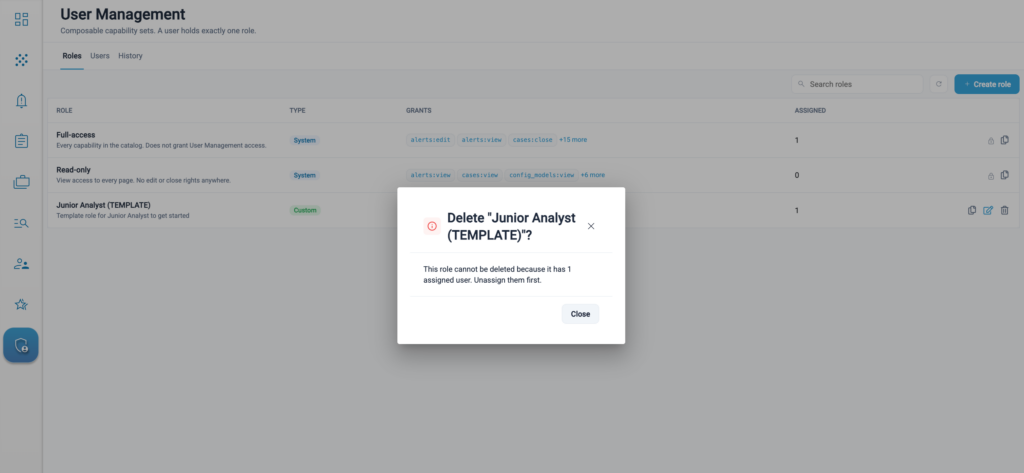
Click the bin icon on a custom role and confirm. Deletion cannot be undone.
You cannot delete a role while any user is still assigned to it. Reassign those users first. The Assigned count on the Roles tab indicates how many users are assigned to the role.
Assigning a role to a user
The Users tab lists every user in your company.
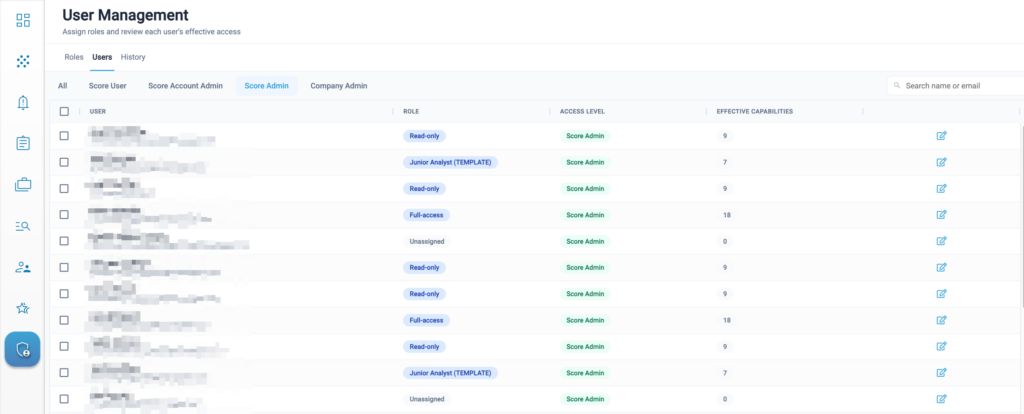
The table shows:
- User — Name and email address.
- Role — The single role the user holds, or Unassigned.
- Access level — Score User, Score Account Admin, Score Admin, or Company Admin.
- Effective capabilities — The number of capabilities the user has after their access level has been applied.
Filter the list by access level using the All · Score User · Score Account Admin · Score Admin · Company Admin controls, or search by name or email.
To assign or change a user’s role:
1. On the Users tab, click the pencil icon on the user’s row.
2. Under Assigned role, select a role. Start typing to filter the list. Each user holds exactly one role.
3. The Effective permissions panel updates to show the capabilities the user will hold.
4. Click Save.
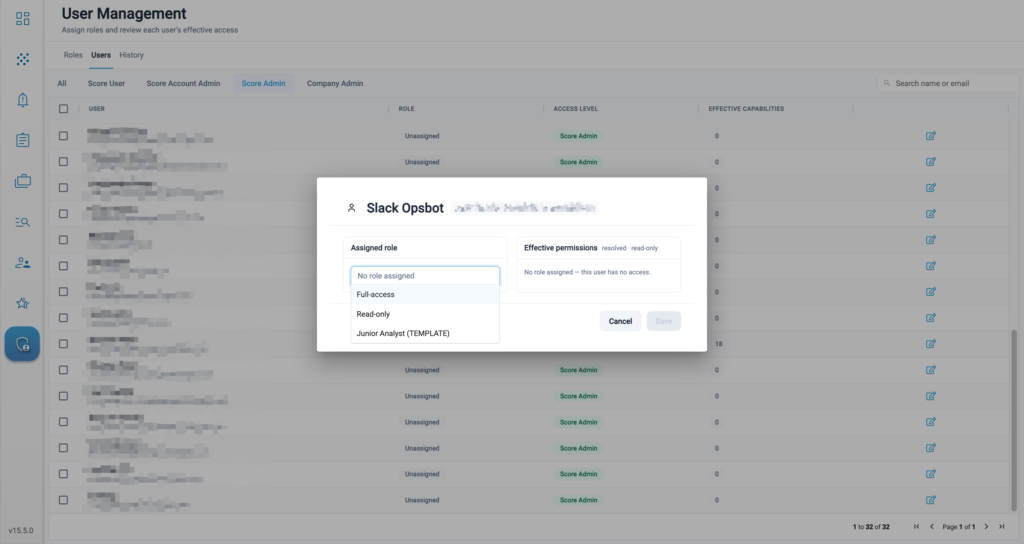
The change takes effect immediately and access is recalculated across the platform within 30 seconds. A role change during a departure or an incident is effective right away rather than at the user’s next login.
Effective permissions shows the users current capabilities. Review this instead of the Role definition before saving.
Users with no role
A Score Admin who has never been assigned a role has full access. Their assignment dialog shows No role assigned — by default this will be full access, although their Effective capabilities count is shown as 0.
Users you cannot assign a role to
A lock icon in place of the pencil means you cannot assign that user a role. Filter by access level to see which is which — every Score Admin row is editable, and every other row is locked. See Roles available to users for more information.
If you need to assign a role to a user and their row is locked, they must be provisioned as a Score Admin in TT User Setup first.
Granting an auditor read-only access
Internal auditors, external auditors, and regulators often need access to your surveillance activity without any ability to change it. The Read-only role provides this.
Before you start: the auditor must be provisioned as a Score Admin in TT User Setup. Roles can only be assigned to Score Admins, so until that is done their row on the Users tab is locked.
1. On the Users tab, click the pencil icon on the auditor’s row.
2. Under Assigned role, select Read-only.
3. Click Save.
Read-only grants view access to every page and no edit or close rights anywhere. It cannot be edited or deleted by any administrator.
Pair the role with the History tab to confirm that the account could not alter anything during the period under review.
Viewing the change history
The History tab records every role change and every role assignment in your company. It is read-only and append-only. No user can edit or delete an entry, including a Company Admin or a TT Super Admin.
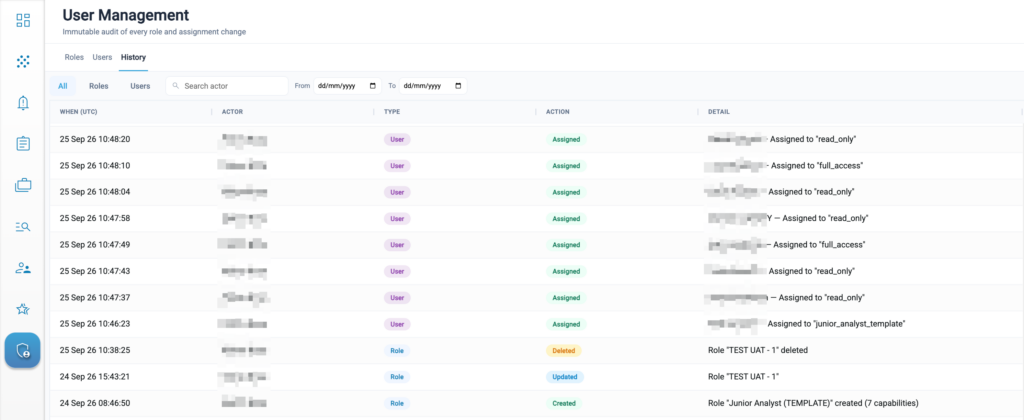
Each entry records:
- When (UTC) — The date and time of the change. History timestamps are always UTC, regardless of the time zone set in your preferences.
- Actor — The Company Admin who made the change.
- Type — Role for a change to a role definition, User for a change to a user’s assigned roles.
- Action — Created, Updated, Assigned, or Deleted.
- Detail — What changed. Role entries name the role and, on creation, the number of capabilities it carries. Assignment entries name the user and the role assigned.
Filter the history using the All · Roles · Users controls, search by actor, or set a From and To date range.
Capability reference
Nine pages are grantable, carrying 18 capabilities in total. A Full-access role holds all 18, which is what a Score Admin has by default.
| Page | Access model | Capabilities | Notes |
| Dashboard | None / Visible | dashboard:view | Trend charts only. |
| Surveillance | None / View / Edit + close | surveillance:view, surveillance:edit, surveillance:close | Clusters and actions. Edit means act on clusters; close is granted separately. |
| Alerts | None / View / Edit | alerts:view, alerts:edit | Edit means create or modify alerts. |
| Reports | None / View / Edit | reports:view, reports:edit | Carries the cluster and case reports. |
| Cases | None / View / Edit + close | cases:view, cases:edit, cases:close | Same shape as Surveillance. Edit means work the case. |
| DataLens | None / Visible | datalens:view | Raw transaction data. |
| Company Preferences | None / View / Edit | preferences_company:view, preferences_company:edit | Company-wide preferences, including SLAs, tags, and predefined comments. |
| Cross-Product Preferences | None / View / Edit | preferences_cross_product:view, preferences_cross_product:edit | Cross-product monitoring configuration. |
| Configurable Models | None / View / Edit | config_models:view, config_models:edit | Edit means create or modify configurations. |
| User Management | Not grantable | — | Granted by the Company Admin permission in TT User Setup. No role can grant it. |
Your own user preferences are not gated by any capability and remain available, regardless of what role you hold.
Closing is modelled as a positive grant rather than a restriction. A role that can investigate but not close is one holding surveillance:edit without surveillance:close — there is no “cannot close” rule.